embroidered wool coat

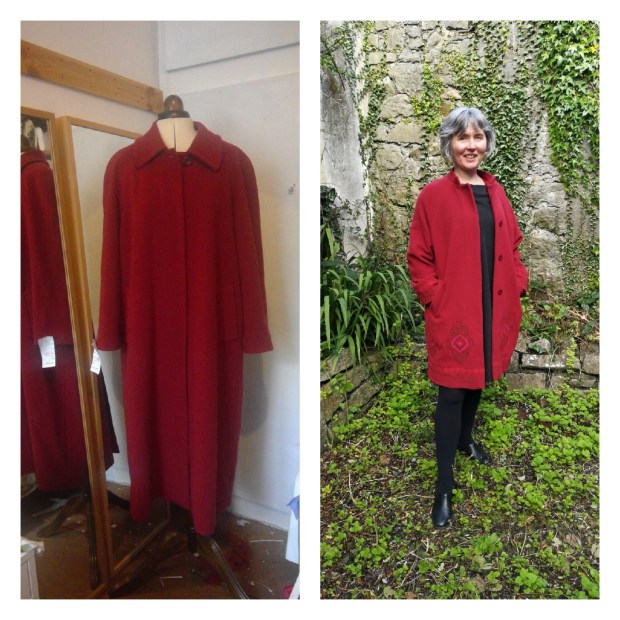
I don’t know if this is a general habit for others, but often if I am working on a long/boring/difficult project I start to plan a nice/interesting project in my head and this project becomes the treat that I can look forward to.  So while I was plodding away with the Irish dance costume, wondering when it would all end….. I was planning to embroider this coat on the left below.
embroidered red coat

The coat is a nice quality wool, and in its day, it would have been a mid-range coat with a basic (ie not satin) lining, although the wool by contemporary standards is excellent.  It had the 80s shoulders (big), a generous cut in all (I think everyone wore big jumpers in the 80s too).  It didn’t sell for €20 didn’t sell for €10 and I bought it at €2.  I was never too sure on the colour as it was a dull rust red so I left it for a while until I figured what pattern to use for it.

I used simpliciy pattern 6733.   The cut is similar to the one I drafted last year, but the simplicity pattern has no darts, and a bit more generous in the cut, and I managed to squeeze it in.  The cut was quick enough – centre front and buttonholes and pockets carefully lined up and cut (and useful to have them all done) – back equally easy to line up.  The sleeves were a squeeze and I find this each time I recut a coat, so as long as I got 2cm past hem line, I could do a faced hem!  The collar was part cut from collar and I cut as short as I could so I would have sufficient fabric for a hood.

I dithered over the design.  Originally I was going to go with one colour only and do a grid of this motif, but it did look and feel a bit bland – a friend of mine suggested the scale of the design was insignificant got me thinking a bit more and I went searching for a another motif so with some other tiny scraps I did another test using this new motif, and loved it as the red and pink seemed to lift the colour and I could do some borders also.  I used motifs from embroideryonline.com.   Originally I was going to try and do a tiled design but once I did the finished the large motifs and placed the half motif I figured it looked a bit busy so left it.  The coat  has 2 borders – one in red, and the other in brown, and there are 8 large motifs around.  The sleeves just have the borders, and I used standard sewing thread for the embroidery.

embroidery  samples

final motifs for embroidered coat

Out of the left over fabric, I recut some back and side facings, and reused the lining, and also cut a hood.  I did not re-cut the lining as the cut was so similar to the coat itself, I just took it in a bit at sleeve head and sides.  I did use some gross-grain ribbon on the hem to give a make a bigger hem, and I like the way the ribbon looks on the inside – I also put my label on the lining with the original! (these are school labels – and I am finding them useful especially for knits so I know the back and front!).  The hang loop was reused.


The hood was a tighter cut, and I had tried to make it more dramatic originally, but when I tried it on I did not like the bigger hood at all, and as the idea of the hood for me is practical, the bigger hood has less weight and would probably blow off occasionally so I trimmed it and had to use some embroidered scraps in the edging.  I put poppers along so its not detachable.

embroidered coat with hood and without

Verdict- so delighted with the coat and wearing it loads.  This red, despite my original misgivings,  is a perfect shade, and the embroidery seems to ‘lift’ it.   It nicely replaced last years red coat which I did not wear that much as the red was a bit overwhelming for me.

I did a stall at a local market and sold some makes and last years red coat was sold.  It a great shade but too bright for me.   The stall was a bit of an experiment as sometimes donating back makes to the charity shop potentially increases their workload, and it could be interesting to find out what people think of the remakes directly.  I priced the makes at secondhand clothes prices – as charging labour time would have been unrealistic,and I wanted to clear the excess makes.  I see these makes as sample sews and considering doing a stall occasionally in the future as I like the making but sometimes I make more than I wear and and sometimes, I make for an experiment.


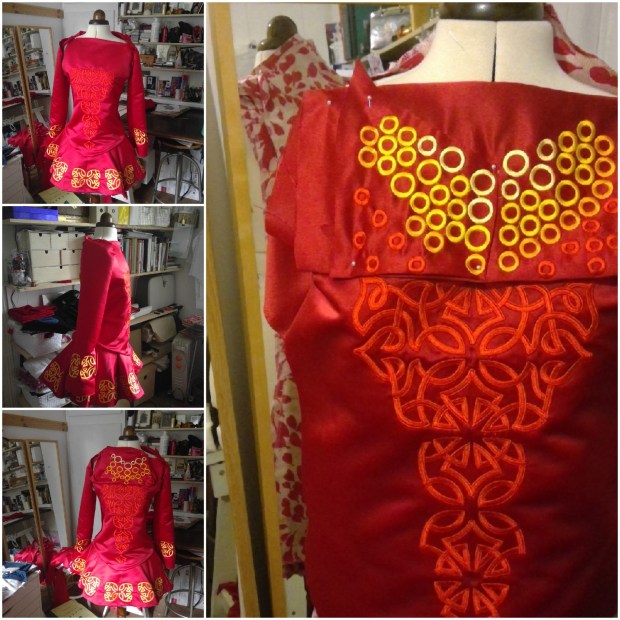
irish dance dress – the long way round

The making of this dress was epic and not in any good way.  I hadn’t realised how lucky I got with the last dress until I was in the thick of this one,

Last June, red was the chosen colour and I tried out some threads on it. The original motifs looked stronger in white (agapanthus leaf) however  Donna (niece/dancer) seemed to like the idea of a celtic motif and I got this one from Embroidery Library.  I had trouble with it from the start and could not get the outlines to work but as it was ‘voted’ a favourite with the outlines, I had to go with it. I tweaked it a bit to get it to fit in.  I figured I could make a simple collar out of ovals and crystal bling-stones could be set into them.  I was not overly enamoured with the whites as I tried out some more samples – then changed to some yellows oranges and reds and it all looked so much better, and it was the last week of August!  I was confident in the pattern as the dress I had made last time still fitted well so I could use the same pattern – my niece however had grown 5 inches!!!! and is no longer 5’3″ but nearer 5’8″,

1 embroidery testing

a mix of embroidery sampling – the lower LHS has a yellow outline on white in the middle  as a trial….

So once the colours were figured, I raced on ahead and the bulk of the embroidery took 7 days – except for the neckline which I ‘designed’ on the Sierra Software – which turned out to be easier this time than the last time as they had a software update.  However the skirt didn’t work like I had anticipated.   Donna had wanted a stiff stand out skirt and I was unsure on how the ‘classic’ one was constructured and the way I figured I would do it didn’t work – and I never did a ‘toile’ so was working on the real fabric all along.

And then after sending some pictures of the embroidery front –  Lisa/dance teacher asked for some changes to the centre front embroideries after I sent on some rough photos – she (rightly) felt the centre front needed definition and could I do an outline in lemon….after the lower bodice was cut

Irish Dance Dress Construction

initial pinnings

I was flumoxed and took a few days to figure what to do and took a break.

The Skirt – I did locate a pattern called guna rince and it seemed like the answer – which it was in part.  It had a pattern and instruction for the underskirt and corresponding overskirt.  I ordered it.  The pattern was what I needed but as the fashion here is for a shorter skirt longer bodice I adapted it a bit by shortening the skirt, and also had to tweak it so it would accommodate the cut skirt I had done.  I used Vilene S80 on the stiff underskirt, and basted interlining of sew-in heavier vilene M12 to the back and a double layer of vilene M12 on the front skirt.

3 construction Irish Dance Dress

The top LHS is the right panel of the back of the dress – the ‘fashion’ here now is no cape/braith at the back but to heavily embroider it in an ‘unexpected’ colour with less bling

The additional embroidery – The issue with the outline was that its not easy to fit in another embroidery after the fact and I did digitize a line on the Sierra software and kinda lined it up.  The difficulty for me is that the hoop on my machine is 150x230cm so the centre front motif took 3 hoopings originally and the outline took 4 and the fabric was pretty stressed by the time, I also figured covering the spaces with some bling would conceal.

The long way and the wrong way

So in all it took 5-8 weeks – the first 2 weeks of August I was only dabbling, and the last week of August I did most of the embroidery. Most of the dress construction was done in the last 2 weeks of September.  It was all rather stressful, as for a while it seemed everything that could go wrong did,   The bobbin tension of the machine was not great throughout, and I had to keep an eye on it.  I am still not sure what went wrong but it got half fixed with changing threads, dusting after each embroidery, and John in the Singer Centre Waterford posted up a new case (which still has not fixed it but helped a lot).  I bought the machine off him originally and cannot recommend him highly enough.  They really offer a great service there, and just plain lovely to deal with

I was also running out of embroidery thread a lot faster than I thought (there were over 600,000 stitches) so had to get WM Trimmings in Dublin  to post extra down from Dublin – They really are a wonderful shop – and both times I phoned lunchtime, and the thread arrived in the post the following morning! (local fabric shop does not carry the shades or the larger spools of thread).

Hindsight

should have made a toile – are these the ‘not so famous last words’?  as I hadn’t realised that the new fashion amongst Irish dancers here is a much shorter skirt (about 4 or 5″ from centre V)   and longer bodice – and I should have added 1.5″ more to the bodice length- my skirt length is 6″.  The dress pictures Donna had sent that she liked had a mix of skirt lengths and she never pointed out specifically till the end about the length.  It was not a deal breaker as the main request was a stiffer skirt.

Verdict 

I was so relieved when Donna tried it on.   when I saw her moving/walking around in it the hang and movement of it was good – and she seemed to move well/confidently in it – although I could swear she grew another inch since the beginning of the summer.  Lisa (Dance Teacher) has given her seal of approval so all good.


The Bling

My Sister, Eithne, is brilliant with the bling – I really don’t know where to start – or end.  She tells me it’s because she goes to so many feis’s (competitions) but I really think its more than that.  Luckily she will bling it – and hopefully I will have a competition dress photo soon!

meanwhile – here are some photos from when we were trying out different stones

4 bling

The Cost

The cost of dresses can run into about €2200 and the costs of this dress without bling ran to about €250 which included – I bought 5m of fabric and I have 1 m left over.  I could have bought less originally but I did need some to sample and am happier to have 1m left as this wa

  1. Fabric and lining – 80
  2. embroidery designs approx – 30
  3. threads approx –  approx 60-80 (yes really!!! )
  4. vilenes and stabelizer  – 40 (I did get too much
  5. machine needles – 5
  6. zip and bias binding – 10
  7. pattern – 40

The bling will cost about €150-200

What now

I am going to toile the Guna Rince pattern as when I compared the two – mine has a higher armhole and different darts so I am curious to the fit – and I also want to get a better pattern for the next dress and figure the shorter skirt long bodice.  I happen to have a cream fabric here that could work as an alternative and work on it slowly over the next few months – but as cream is not a good stage colour I will see if it mixes well with jade? but as one dress is done, there is less pressure now.

I am also keeping the embroidery machine out for the moment – as in order to keep my sanity with the dance dress, I started a side project of another coat so half way through that – and seems to be going to plan…….seems to be

The Finished Dress 

23770332_1835585589793714_59577432_o